Utkath Asana ( The Chair Pose )

In Sanskrit utkata means powerful or fierce .
Utkath Asana ( The Chair Posture )

INSTRUCTIONS :

1. Stand in Tadasana. Inhale and raise your arms perpendicular to the floor. Either keep the arms parallel, palms facing inward, or join the palms.

2. Exhale and bend your knees, trying to take the thighs as nearly parallel to the floor as possible. The knees will project out over the feet, and the torso will lean slightly forward over the thighs until the front torso forms approximately a right angle with the tops of the thighs. Keep the inner thighs parallel to each other and press the heads of the thigh bones down toward the heels.

3. Firm your shoulder blades against the back. Take your tailbone down toward the floor and in toward your pubis to keep the lower back long.

4. Stay for 30 seconds to a minute. To come out of this pose straighten your knees with an inhalation, lifting strongly through the arms. Exhale and release your arms to your sides into Tadasana.

BENIFITS :

Strengthens the ankles, thighs, calves, and spine .
Stretches shoulders and chest.
Stimulates the abdominal organs, diaphragm, and heart.
Reduces flat feet.

Variations :
As you bend your knees, lift up onto the balls of your feet and sit your buttocks down on your raised heels. Extend your arms forward, parallel to each other and the floor, palms down or facing inward.

Deepen The Pose :
The secret to a comfortable stay in Utkatasana is the release of the heads of the thigh bones toward the heels. Once in the pose, bring your hands to your tops thighs. Nestle the bases of your palms into the creases of the groins and push the heads of thighs toward the heels, digging the heels deep into the floor. Against these actions, lift the sitting bones up into the pelvis.


VIDEO TUTORIALS :


Trikona-asana - ( The Triangle Pose)

The Sanskrit word tri means three and kona means corner or angle. Thus "three corner or three angle posture" is often called the triangle posture. This posture is also known as the utthita trikona-asana. Utthita means stretched or extended thus this is the Extended Triangle Pose.

Trikona-asana - ( The Triangle Posture)
TRIKONA ASAN

Instruction:

1. Stand with the feet together and the arms by your sides.
2. Separate the feet slightly further than shoulder distance apart.
3. Inhale and raise both arms straight out from the shoulders parallel to the floor with the palms facing down.
4. Exhale slowly while turning the torso to the left, bend at the waist and bring the right hand down to the left ankle. The palm of the right hand is placed along the outside of the left ankle. The left arm should be extended upward. Both legs and arms are kept straight without bending the knees and elbows.
5. Turn the head upward to the left and gaze up at the fingertips of the left hand. Inhale and return to a standing position with the arms outstretched.
6. Hold this position for the duration of the exhaled breath. Exhale and repeat steps 4 - 6 on the opposite side.


Comments:
The trikona-asana is an excellent posture to do early in your routine. The forward bending and lifting stimulates blood flow and helps to stretch and relax the back, shoulders, legs and arms as well as increases the flow of blood to the head. The muscles of the thighs and calves as well as the hamstrings are stretched. The slight twist of the spine creates suppleness in the spinal discs and relieves lower back discomforts.

The posture can be held longer by breathing gently through the nostrils rather than holding the breath. Another variation is to perform the trikona-asana rapidly thereby giving it a slightly aerobic effect.


Durations/Repetitions:
Remain in the forward bending position for the duration of the exhale breath. Do two or three repetitions (one repetition consists of bending forward on both sides).

Easy Video Tutorials

Chakra-asana (The Wheel Pose)

Chakra, from the root cak ("to move") means wheel and therefore this is the Wheel Posture.The chakra-asana is also known as the urdhva-dhanurasana. Urdhva means raised, elevated or upright and dhanur means bow. Both "wheel posture" and "raised bow posture" describe the appearance of this asana.


Chakra-asana (The Wheel Posture)


Instruction:
1 Lie flat on the back in the shava-asana.
2 While exhaling bend the knees and bring the feet as close to the buttocks as possible with the soles of the feet flat on the floor.
3 Bend the arms at the elbows and place the palms of the hands flat on the floor directly under each shoulder with the fingers pointing toward the back.
4 While inhaling slowly, begin to raise the head, back and buttocks off the floor while arching the spine. Continue to press downward on the hands and feet while raising the hips and stomach as high as possible.
5 Hold for the duration of the held inhaled breath. When you can't hold the breath comfortable any longer, slowly exhale and return the back to the floor, slide the legs out straight returning to the shava-asana.


Comments:
The chakra-asana is more challenging than most other yoga postures. Don't be discouraged if your unable to accomplish it right away. Even attempting this posture without successful completion holds great benefits.


First and foremost is the strength and suppleness it restores to the spine. It strengthens the arms, shoulders and upper back as well and stimulates the cardiovascular system. The chakra-asana has an overall tonic effect for the entire body.

As the natural suppleness of the spine is restored after a period of practice you can begin to perfect the form of this asana and thus experience greater benefits.

First be certain that the arms are as straight as possible with very little to no bend in the elbows. When you can hold this comfortably, begin breathing through the nostrils while holding the posture and attempt to get a greater arch in the spine by bringing your hands closer to your feet and/or bringing your feet closer to your hands. Finally, you can extend the duration of the chakra-asana by doing several repetitions in sequence without resting in-between. As you return from the posture keep the hands behind the shoulders and the soles of the feet flat on the floor and as soon as the back returns to floor immediately raise it and enter the full posture again.


Durations/Repetitions:
The chakra-asana is either held for the duration of the inhaled breath or between one and three minutes while breathing gently through the nostrils. Repeat it two or three times.


The "Bridge" Variation:
Although this variation is much easier to perform than the full chakra-asana, it shares several of its benefits. In particular it will help to stretch the spine and relieve tightness in the upper back and shoulder area.To get the full benefit of the bridge variation continual effort should be applied to raising the back upward and creating the greatest possible arch with the spine. While holding the bridge breath slowly through the nostrils. If there is no discomfort felt in the spine or shoulders then one should advance to the full variation of the chakra-asana as described above. Both variations strengthen the back and promote flexibility of the spine. Tightness in the back and spine results from poor posture, stress, a sedentary lifestyle and/or emotional disturbances. You should begin to feel the tightness being released after just a few repetitions.


Easy Video Tutorials

Parivritta-parshvakona-asana (The Turned Side-Angle Pose)

The Sanskrit word parivritta means revolved, turned round or back, parsva means side and kona means angle.

"As inumerable cups full of water, many reflections of the sun are seen, but the sun is the same; similarly individuals, like cups, are inumerable, but spirit, like the sun, is one." The Shiva-samhita I.35

Parivritta-parshvakona-asana (The Turned Side-Angle Posture)


Instruction:
1 Stand with the feet together and the arms by your sides (see the tad-asana).
2 Inhale and spread your legs apart slightly further than shoulder distance (about 3-4 feet).
3 Stretch your arms straight out from the shoulders parallel to the floor with your palms facing down.
4 Exhale slowly and turn your right foot toward the right 90 degrees. Bend your right knee about 90 degrees.
5 Place the palm of your left hand flat on the floor next to the outside of your right foot. Rest the right elbow on the outside of the right knee.
6 Stretch the right arm over your head, parallel with the floor, with the inside of the elbow resting on the ear. Hold for abot 30-60 seconds while breathing gently through the nostrils.
7 Slowly return to a standing position and repeat on the other side reversing directions 2-6.


Comments:
The parivritta-parshvakona-asana stretches the muscle group along the side of the torso. It strengthens the ankles, claves and thighs as well as the arms. It is also an excellent posture to tone the muscles in the waist and hips. This posture also strengthens the digestive system and thus aids digestion, stimulates blood circulation and assists in restoring strength and flexibility to the spine.


Durations/Repetitions:
Hold the posture for as long as is comfortable. Performing the parivritta-purvashakona-asana once on each side is considered one repetition. Do 2 or 3 repetitions.

Easy Video Tutorials


Vriksha-asana - (The Tree Pose)

The Sanskrit word vriksha means tree, thus this is the Tree Posture.
"Standing straight on the left leg, bend the right leg and place the right foot on the root of the left thigh. Stand thus like a tree on the ground. This is called vriksha-asana." Gheranda-samhita II.36


Vriksha-asana - (The Tree Posture)


Instruction:
1 Stand with the feet together and the arms by your sides (see the tad-asana).
2 Bend the right leg at the knee, raise the right thigh and bring the sole of the right foot as high up the inside of the left thigh as possible.
3 Balancing on the left foot, raise both arms over the head keeping the elbows unbent and joining the palms together. Hold the posture while breathing gently through the nostrils for about 10 complete breaths.
4 Lower the arms and right leg and return to the tad-asana, standing position with feet together and arms at the sides. Pause for a few moments and repeat on the opposite leg.


Comments:
The challenge of the vriksha-asana is maintaining balance on one leg. Poor balance is often the result of a restless mind or distracted attention. Regular practice of this posture will help focus the mind and cultivate concentration (dharana).
When practicing vriksha-asana it may help to imagine or picture a tree in the mind and apply the following technique: Imagine that the foot you are balanced on is the root of the tree and the leg is the trunk. Continue by imagining the head and outstretched arms as the branches and leaves of the tree. You may be unsteady for a while and find the body swaying back and forth, but don't break the concentration. Like a tree bending in the wind and yet remaining upright, the body can maintain balance.
Aim to achieve the "rootedness" and firmness of a tree. Regular practice of the vriksha-asana improves concentration, balance and coordination. Because the weight of the entire body is balanced on one foot, the muscles of that leg are strengthened and toned as well.
As you advance in this posture and are able to remain standing for more than a few moments, try closing the eyes and maintaining your balance.


Durations/Repetitions:
Hold the vriksha-asana as long as your comfortably can. Repeat it two or three times on each leg.

Easy Video Tutorials


Pavana-mukta-asana (The Wind-releasing Pose)

The Sanskrit word pavana means air or wind and mukta means freedom or release, therefore this is the "wind relieving posture" so named because it assists in releasing trapped digestive gas from the stomach and intestines.


Pavana-mukta-asana (The Wind-releasing Posture)


Instruction:
1 Lie flat on the back in the shava-asana.
2 Inhale and bend the right knee and pull it close to the torso with both hands while interlocking the fingers just below the knee. Keep the left leg flat on the floor.
3 Hold the inhaled breath for a few seconds then exhale slowly through the nostrils and lift the back, shoulders and head off the floor and touch the knee with the forehead.
4 Hold the exhaled breath for a few seconds then slowly inhale and return the back, shoulders and head to the floor. Remain holding the knee.
5 Hold the inhaled breath for a few seconds then exhale while bringing the right leg to the floor.
6 Lie flat on the back in the shava-asana for a few seconds then repeat beginning with the left leg.

Comments:
As mentioned above, practicing the purvana-mukta-asana will help to release gastrointestinal gas. It is also improves other gastrointestinal problems like upset stomachs and constipation by stimulating the abdominal region.

Durations/Repetitions:
Hold each of the four parts of this posture (corresponding with the held breaths) for three to five seconds each. Repeat the purvasa-mukta-asana three to five times on each side.

Vajra-asana (The Thunderbolt or Diamond Pose)

The Sanskrit word vajra means thunderbolt or diamond.


"Make the thighs tight like adamant and place the legs by the two sides of the anus. This is called the Vajra-asana. It give psychic powers to the Yogi." Gheranda-samhita II.12


Vajra-asana (The Thunderbolt or Diamond Pose)


Instruction:
1 The vajra-asana is a seated posture. Begin by sitting back on your heels and placing your knees, legs and feet together.
2 Keeping the back straight place the palms of your hands down on top of your thights.
3 Breath gently thorugh your nostrils and sit in this position for at least three minutes.


Comments:
The vajra-asana is a versatile posture well suited for meditation, rest in between other seated postures, or as an aid to digestion.
The vajra-asana is the first stop in various other yoga postures such as the anjaneya-asana (salutation posture) and the ushtra-asana (the camel).


Durations/Repetitions:
The vajra-asana can be held for as long as is comfortable(and depending on the reason for doing the posture).

Video Tutorials

Anjanaya-asana - (The Salutation Pose)

The Sanskrit word anjaneya means salutation or praise from the root anj which means to honor, to celebrate, to anoint.

"As inumerable cups full of water, many reflections of the sun are seen, but the sun is the same; similarly individuals, like cups, are inumerable, but spirit, like the sun, is one." The Shiva-samhita I.35 II.42-43.

Anjanaya-asana - (The Salutation Pose)

Instruction:
1 Sit comfortably in the vajra-asana (thunderbolt pose).
2 Kneel up on your knees until your back, buttocks and thighs are aligned.
3 Extend your left foot foward bending your left knee at about a 90 degree angle.
4 Place the palms of your hands together at the heart in the anjali-mudra.
5 Raise your arms stright up keeping the palms together while bending the head backward and looking up.
6 Slowly bend backward stretching the arms backward and straightening out the right leg. Hold this position for as long as comfortable while breathing gently through the nostrils.
7 Come back to the vajara-asana (thunderbolt pose) then reverse the posture by alternating legs.
Comments:
The anjaneya-asana combines several postures and mudras (gestures) in a fluid, evolving flow that combines motion, stretching and holds. It delivers great benefits for the back, arms, chest, legs and hips. Regular practice will strengthen concentration and improve balance.
Perform this posture with a sense of reverence and praise. Take a moment to reside in silence and peace as your hands are held at the heart in the gesture (mudra) of salutation (anjali-mudra). Keep the intention of praise in mind as you extend your arms skyward. Feel your entire body-mind-heart extending outward in recognition of the sacredness of life.
Durations/Repetitions:
Repeat twice on each side.

Akarna-dhanura-asana ( The Shooting-bow Pose )

The Sanskrit word karna means ear and the prefix "a" means near to or towards. Dhanur means bow-shaped, curved or bent. The "bow" here referred to is a bow as in "bow and arrow." Literally we could translate this as the near-the-ear bow posture but because of the obvious appearance of the posture we'll call it the shooting bow posture.
"Having caught the toes of the feet with both hands and carried them to the ears by drawing the body like a bow, it becomes Dhanura-asana." The Hatha-Yoga-Pradipika I.27.


Akarna-dhanura-asana (The Shooting-bow Pose)


Instruction:
1Sit on the floor with the legs together and extended straight out in front. Keep the back straight, shoulders level and head straight. Place the hands, palms down, flat on top of the thighs then inhale deeply.
2Exhale and reach down and loop the forefinger of the right hand around the big toe of the right foot and grasp the left foot with the left hand.
3Inhale and pull the right foot back placing the big toe next to the right ear. Straighten the back as much s possible and hold the posture for the duration of the inhale breath.
4Exhale and return to the seated position of step #1 then repeat the posture on the opposite side.


Comments:
While performing this posture imagine yourself as an archer with your gaze focused on a target and the arrow gracefully and steadily being pulled back in the bow. Hold the posture as steady as an archer would hold an arrow aimed at its target. Return the foot to the floor gently. This simple technique will help cultivate focused and unwavering attention.


Durations/Repetitions:
This posture should be held for a minimum of 30 seconds and can be extended to up to several minutes. Repeat at least twice with each leg.


Variations:
Reverse the hands and feet so that that the right hand pulls the left foot to the left ear and vice versa. The foot gets pulled under the outstretched arm.

Vrischika Asana ( The Scorpion Pose )

Vrischika is the Sanskrit word for scorpion. This posture is so named because the body resembles a scorpion with its tail arched above its head ready to sting its victim. Although it may not be a simple posture for beginners to perform, the Scorpion is not as difficult as it may at first seem.


Vrischika-asana The Scorpion Posture


Instruction:

1. Kneel on the floor and lean forward placing the elbows and forearms flat on the floor with the palms facing down. Your arms should be placed about shoulder-distance apart.


2. Extend your head forward and lift it as high as possible.
3. Raise the buttocks and place the feet firmly on the bottoms the toes.
4. Inhale a swing the legs up and over the head while maintaining your balance. Bring the legs straight up over your head.


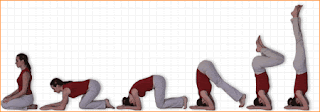
5. Slowly bend the knees and drop the legs toward the head being careful not to move too quickly or drop the legs to far while maintaining balance.
6. Reverse the steps above and return to a kneeling position.


Comments:
The Scorpion should not be attempted until you are comfortable with all the balance postures (e.g.: Vriksha-asana, Ekapada-asana, etc.) as well as the Headstand (Sirsha-asana). Beginners should do this posture under the supervision of a qualified teacher. When first attempting the Scorpion asana you may want to try it while facing a wall. Position yourself so that when you are doing step #1 above your head is about 2 - 3 feet from the wall. This way if you lose your balance you can use the wall for support.
This posture will provide maximum stretch to the neck, spine and chest. It combines many of the benefits of the Chakra-asana (the Wheel posture) and the Sirsha-asana (the Headstand).


Durations/Repetitions:
Hold the vrischika-asana for as long as you are comfortable. Keep in mind that returning from the posture gracefully without falling out of it will take some strength, so don't hold it too long. 20-30 seconds is fine for early attempts, increase the time gradually as you become more proficient.


Variations:
There are two common variations to this posture illustrated and described below:

To do the first variation, illustrated above, after entering the Scorpion as described above slowly raise the legs straight up until your feet are directly over your head (you won't, of course, be able to see this but you will easily be able to feel when they are properly positioned). This variation requires a bit more strength and a stronger sense of balance then pose described above.

To do the second variation, illustrated above, after entering the Scorpion as described above slowly drop the legs bring the feet closer to the head until the soles of the feet are resting on the top of the head. This variation will require a greater arch, and thus more flexibility, of the spine then either the standard form or the variation above.

VIDEO TUTORIALS

Baddha-kona-asana ( The Restrained Angle Pose )

The Sanskrit word baddha means a bond, chain, caught or restrained. The word pada means foot, and kona means corner or angle therefore this is the restrained-foot-angle posture.


Baddha-kona-asana ( The Restrained Angle Posture )


Instructions :
1. Sit on the floor with the legs together and extended straight out in front. Keep the back straight, shoulders level and head straight. Place the hands, palms down, flat on top of the thighs then inhale deeply.
2. Exhale and bend the knees drawing the feet toward the torso.
3. Place the soles of the feet together, clasp the hands over the feet interlocking the fingers pulling the feet closer and placing the heels against the perineum. The outer edge and small toe of each foot should touch the floor.
4. Lower the knees to the floor and keep the back straight. Use the elbows to press down on the thighs if necessary to bring the calves and knees to the floor. Hold the posture breathing gently through the nostrils.
5. Release the posture and sit with the legs extended out and hands on the thighs.

Comments:
Regular practice of the baddhakona-asana stretches the knees and stimulates circulation in the legs. It should be practiced frequently until one is comfortable sitting in the padma-asana. The main areas of the body that are stimulated, besides the legs, are the stomach, pelvis and lower back. It is said to keep the kidneys, prostate and bladder healthy. The baddha-konasana is one of the few postures that can be practiced comfortably soon after eating.

Durations/Repetitions:
Hold the posture from thirty seconds to two minutes depending on comfort. Repeat two or three times.

Easy Video Tutorials

Ugra Asana ( The Noble Pose )

The Sanskrit word ugra means powerful, mighty, strong or noble. We usually keep this posture untranslated but it can be called the noble or powerful posture.

Also known as the pascimottana-asana or the brahmacharya-asana. The word pascima can mean behind, later, last or final but it literally means "western" as in the direction. Pascimottana thus means back-stretching posture.


"Having stretched the feet on the ground, like a stick, and having grasped the toes of both feet with both hands, when one sits with the forehead resting on the thighs, it is called Pascimo-tana-asana" (or ugra-asana). This Pascimo-tana carries air from the front to the back part of the body. It kindles gastric fire, reduces obesity and cures all diseases of men."Hatha-Yoga-Pradipika I.30-31


Ugra-asana - The Noble Posture


Instruction:
1. Sit on the floor with the legs together and extended straight out in front. Keep the back straight, shoulders level and head straight. Place the hands, palms down, flat on top of the thighs then inhale deeply.
2. Exhale and extend the arms straight out in front, parallel with the floor with fingers pointed straight ahead and palms facing down.
3. Inhale slowly while raising the arms over the head, keeping them straight, and bending as far back as is comfortable. Tilt the head back and look up at the hands.
4. Exhale slowly bending forward at the waist and grasp the feet with the hands. Bring the head as close to the knees as possible, placing it on the knees if you can, keeping the legs straight. (If you are unable to grasp the feet then grasp the ankles).
5. Hold that position for the duration of the exhale breath.
6. Inhale slowly and return to the seated position described in step #1.


Comments:
When the ugra-asana is properly performed, all the vertabrae of the spine and each muscle in the back is stretched. This type of stretching is highly beneficial. Try it regularly for a week and you will, without doubt, notice the benefits.

The compression or contraction of the stomach followed by the release increases blood flow to the abdominal region and tones the muscles. Gas is release and sluggish digestion and/or constipation is improved. The muscles in the calves and thighs get a good stretching, helping to relieve fatigue and soreness in the lower extremities.

Duration
Repeat this posture two or three times holding each repetition for the duration of the exhaled breath and take at least three deep breaths in-between each repetition. As you become more adept at doing the ugra-asana you may begin breathing slowly through the nostrils while holding the posture to increase its duration.

Variations:
When you are able to bring the head down to the knees in the ugra-asana you may try one of the following variations:
Variation 1 - While holding the variation described above slowly bring the elbows to the floor just outside of the knees while continuing to hold the feet.

Variation 2 - Instead of grasping the feet, grasp the big toe on each foot with the thumb and index finger by looping them around the toe.

Variation 3 - Instead of grasping the feet, clasp the fingers in both hands around the soles of the feet so that the feet are "cupped" in the hands.
Variation 4 - Grasp one wrist with the other hand (the left with the right or the right with the left) instead of grabbing the feet or clasping the fingers and place the head below the knees resting on the shins. This variations calls for extreme flexibility of the spine and lower back.
VIDEO TUTORIALS


Ekapada Asana ( The One-legged Pose )

The Sanskrit word eka means one and pada means foot making this the one-foot, or more commonly, one-legged pose.

Ekapada-asana - The One-legged Posture


Instruction:
1. Stand with the feet together and the arms by your sides (see the tad-asana).
2. Focus the eyes straight ahead on a spot midway between waist and eye level and remain focused there throughout this asana. (standing about five feet from a wall would be helpful).
3. Inhale and extend the arms directly in front, parallel with the floor with thumbs touching.
4. Exhale and raise the right knee bending the leg at a 90 degree angle, pause for a moment then extend the leg straight out in front pointing the toes forward.
5. Pause for a moment then swing the leg backward while bending forward at the waist.
6. Breath slowly through the nostrils and make sure the arms, torso and legs are parallel with the floor.
7. Hold the posture for at least 30 seconds and then return slowly to a standing position.

Comments:
The ekapada-asana tones and strengthens leg muscles, improves sense of balance and helps sharpen concentration. The ekpada requires that you become aware of your body/mind as a whole. As you practice this posture turn the attention away from distractions of the mind and center it on full body-awareness. Continual effort in the ekpada-asana in this way will help cultivate concentration. The "closed eyes" variation (see below) intensifies the effect of the posture. Instead of relying on a fixed point of vision as an "anchor" the practitioner will cultivate an inner stability. The ekpada-asana also gives strength to the hips and lower back.

Durations/Repetitions:
This posture should be held for a minimum of 30 seconds and can be extended to up to several minutes. Repeat at least twice on each foot.

Variations:
When you can remain in the ekpada effortlessly for at least 30 seconds without wavering or losing balance, try doing it with the eyes closed. This variation makes the posture quite challenging but it increases the benefits as described above.

Tada-Asana ( The Mountain Pose )

The Sanskrit word tada means mountain. This posture is also known by the name samasthiti-asana. Sama means unmoved, equilibrium, and sthiti means standing upright or firmly, abiding, remaining, thus samasthiti means standing firmly without moving.

Tada-asana - The Mountain Posture

Instruction:
1. Stand with both feet touching from the heel to the big toe, keeping the back straight and the arms pressed slightly against the sides with palms facing inward.
2. Slightly tighten or flex the muscles in the knees, thighs, stomach and buttocks maintaining a firm posture. Balance you weight evenly on both feet.
3. Inhale through the nostrils and lift the buttocks off the legs arching the back and thrusting the abdomen forward and tilt the head as far back as possible.


Comments:
Many common ailments and discomforts can be traced to poor posture. If the spine is not properly aligned or if there is tightness or stiffness in the back, the result is often an imbalance in the body. When this imbalance becomes chronic many kinds of disorders arise in the organs, glands and nervous system.

Performing the tada-asana allows one to observe one's posture closely and clearly recognize those problems which get masked or ignored by day-to-day activities. As the posture is held and the breath, mind and body is quieted various effects will surface to indicate difficulties with the spine. Favoring one foot over the other, shifting back and forth, drooped shoulders, tightness in the neck and upper or lower back, and various other physiological disturbances may appear indicating the need for further yoga practice.

The proper execution and continual practice of the tada-asana along with other postures helps to re-train the body to stand correctly and reverse the negative effects of poor posture.
When the tad-asana is performed properly and the mind is focused and free of distraction, the body is experienced as being rooted firmly to the earth and as steady and motionless as a mountain.


Durations/Repetitions:
One repetition for several minutes is advisable. The tada-asana is also recommended prior to and following any other standing posture.


Easy Video Tutorials

Padma Asana ( The Lotus Posture )

The Lotus Pose is one of the classic seated meditative postures, fostering a calm, serene sense of internal connection. Eventually it'll feel like heaven—we mean, Nirvana.

"Place the right foot on the left thigh and the left foot on the right thigh...with the soles upward, and place the hands on the thighs, with the palms upwards...This is called Padma-asana, the destroyer of all diseases. It is difficult of attainment by everybody, but can be learned by intelligent people in this world. The Hatha-Yoga-Pradipika I.46-49

Padma-asana - The Lotus Posture


Instruction:
1. Sit on the floor with the legs stretched out straight in front.
2. Bend the right knee and grasp the right foot with both hands and place it on top of the left thigh bringing the heel as close to the navel as possible.
3. Bend the left knee and grasp the left foot with both hands and place it on top of the right thigh bringing the heel as close to the navel as possible.
4. Both knees should be on the ground and the soles of the feet are pointed upward. The spine is held straight but not rigid.
5. The position of the legs may be switched after a period of time if the posture becomes uncomfortable.

Comments:
When in the padma-asana the hands can be placed in one of the following three positions:
Place one hand on top of the other, both palms up, and rest the hands on the heels (this is known as the dhyana-mudra). This variation is recommended for meditation.
Place the hands on the knees, palms down.

With palms up, place the hands on the knees, form a circle with the thumb and forefinger and extend the remaining fingers straight ahead (this is known as the chin-mudra). Recommended for pranayama (Yogic breathing). The padma-asana facilitates relaxation, concentration and ultimately, meditation. The posture creates a natural balance throughout the body/mind. When the knees are stretched enough to remain in the padma-asana without discomfort the posture creates a feeling of effortlessness and ease that will soothe the nervous system, quiet the mind and bring about the condition of one-pointedness.


Durations:

The length of time to sit in the padma-asana depends on your intention. In the course of a typical asana routine you might hold it for several minutes or until you experience discomfort in the legs. When used as a meditation posture you hold it for the duration of the meditation.

Variations:
If you find the padma-asana difficult or painful, can try the ardha padma-asana variation or half lotus posture (ardha means half). Instead of placing both feet on the thighs, only one foot is place on top of the opposite thigh and the other is place under the opposite thigh. Periodically alternate positions to allow both knees to be stretched. Those who are unable to do either variation of this asana comfortably should practice the baddha kona-asana.

VIDEO TUTORIALS


Simha Asan ( The Lion Pose )

The Sanskrit word simha which literally means "the powerful one" is the word for "lion." This, therefore is known as the lion posture, and one performing it can be said to resemble a roaring lion about to attack.

"Place the two heels under the perineum with soles turned upwards; hands to rest on the knees which should touch the ground. Open your mouth as you perform the jalandhara-mudra (chin lock) and fix your gaze on the root of the nose. This is Simha-asana, the destroyer of all diseases." Hatha-yoga-pradipika I.37

Simha-asana - The Lion Posture


Instruction:
1. Sit up on the knees with the heels of the feet pressed against the buttocks and the calves of the legs flat on the floor.
2. Place the balls of the hands on the knees, straighten the arms and keep the back erect and the head straight (not tilted forward, back, to the left or the right).
3. Inhale while leaning forward slightly, stretching the mouth the jaws as wide as possible, extend the tongue out and downward as much as possible, fix your gaze either at the tip of the nose or between the eyebrows and stretch the fingers straight out from the knees.
4. Hold the posture for the duration of the inhaled breath then exhale, relaxing the forward stretch, dropping the fingers to the knees and closing the mouth and eyes.

Benefits:
The simha-asana benefits parts of the body that most other asanas do not: the face, jaw, mouth, throat and tongue. Those who experience tightness or discomfort in the jaws such as teeth grinding, clenched jaws, a misaligned bite, etc. will benefit from both the jaw and tongue stretching of the simha-asana. This asana is also known to help prevent or cure sore throats. The muscles and tissues of the face are rejuvenated from the alternating stretching and release, an exercise they rarely get in the course of our everyday lives. The fixed gaze relieves tense or burning eyes and the stretched fingers benefits the hands and wrists.
Durations/Repetitions:
Hold the simha-asana for thirty to sixty seconds and repeat three to five times.
Variations:
Try roaring loadly like a lion as you enter into the Lion Pose while sticking your tongue out. This stimulates the throat and cultivates courage and fearlessness. Kids love to do it, shouldn't adults as well?


Easy Video Tutorials

Nataraja-asana (The Lord of the Dance Posture )

The Sanskrit word nata means dancer and raja means king. Nataraja is another name for Shiva, the Lord of the Dance, whose cosmic dance is the creation and destruction of the world.


"As inumerable cups full of water, many reflections of the sun are seen, but the sun is the same; similarly individuals, like cups, are inumerable, but the vivifying spirit, like the sun, is one." The Shiva-samhita I.35 II.42-43.
Nataraja-asana (The Lord of the Dance Posture )


Instruction:
1 Stand with the feet together and the arms by your sides (see the tad-asana).
2 Inhale and bend the right leg backward grasping the left foot with your left hand while simultaneously extending the right arm straight out in front.
3 Continue raising the right arm upward until it is about 45 degrees from the floor while lifting the left leg as high as possible with the left arm.
4 Hold the posture while breathing gently through the nostrils. Keep your gaze fixed slightly above the horizon.
5 Remain in the nataraja-asana for about one minute then return slowly to a standing position. Repeat by reversing directions 2-4.

Comments:
Perform the nataraja-asana gracefully as if dancing, yet firmly with focused attention. This posture helps to strengthen your sense of balance and concentration. The arch formed by the back and stretched leg gently aligns the vertebrae of the spine restoring suppleness and easing strain caused by poor posture or long periods of sitting. It tones the muscles of the hips and legs as well as stimulates the chest muscles.


Durations/Repetitions:
Begin by holding the nataraja-asana for about a minute and gradually increase the time as you become more comfortable with this posture. Repeat it three times on each side, alternately from right to left.


Easy Video Tutorials

Vira Asana ( The Hero Pose )

The Sanskrit word vira means warrior, brave or eminent man .
"Place one foot on the opposite thigh and turn the other foot backwards, This is the Vira-asana" Gheranda-samhita II.17 "One foot is to be placed on the thigh of the opposite side; and so also the other foot on the opposite thigh. This is called Vira-asana"Hatha-yoga-pradipika I.23


The Warrior Pose (Vira-asana)


Instruction:
1. Kneel on the floor with the calves and tops of the feet flat on the floor and the thighs touching.
2. Slowly spread the feet, about shoulder distance apart, while keeping the knees together. Place the buttocks flat on the floor. The outer sides of the thighs are touching the inner sides of the calves and the soles of the feet are exposed facing up. Place the hands palms downs, on the knees and form a circle with the thumb and forefinger (in the chin-mudra) while pointing the other fingers straight ahead.
3. Breath slowly and deeply through the nostrils and remain motionless for six complete breaths (an inhale and exhale is one complete breath).
4. Inhale slowly and stretch the arms straight up over the head and interlock the fingers with the palms pushed upward. Remain in this position for six complete breaths.
5. Exhale slowly, release the fingers and slowly bend forward at the waist while placing the palms of the hands flat on the soles of the feet. Place the chin between the knees.
6. Hold this position for the duration of six complete breaths.Inhale, raise the chest up, stretch the legs straight ahead and place the hands, palms down, on top of the thighs.

Comments:
The vira-asana is an alternative to the padma-asana, siddha-asana, as well as other seated postures, for mediation and pranayama.

Durations/Repetitions:
Hold the posture from several minutes as part of an asana session or for the duration of your meditation or pranyama.

Variations:
The Supta-vira-asana variation (supta is the Sanskrit word for "lying down") stretches the abdominal muscles and relieves pain and discomfort in the legs. Begin the posture as detailed above then incline backwards and lean the back on the floor. The arms are stretch straight above the shoulders and kept flat on the floor.


Easy Video Tutorials


Sirsha Asana ( The Head Stand Pose)

The Sanskrit word sirsha means head. This posture is the well-known headstand posture, and perhaps second only to the padma-asana or lotus posture, is widely identified with the practice of Yoga.

Sirsha Asana ( The Head Stand Pose)

Instruction:
1. Sit in a kneeling position with the buttocks resting on the heels of the feet.
2. Lean forward and place the forearms on the floor in front while keeping the elbows about shoulder distance apart. Interlock the fingers of both hands.
3. Place the top of the head flat on the floor with the back of the head pressed against the inside of the interlocked fingers.
4. Placing the tips of the toes firmly on the floor while lifting the heels, raise the knees off the floor.
5. Hold for the duration of the held inhaled breath. When you can't hold the breath comfortable any longer, slowly exhale and return the back to the floor, slide the legs out straight returning to the shava-asana.
Benefits:
The headstand or sirsha-asana is perhaps the most well-known Yoga posture. Its benefits are many and is fully deserving of all its notoriety. Its physical and mental benefits derive both from emphasis on balance and the body's inverted position. Before attempting the sirsha-asana beginners to Yoga should wait until they have mastered some of the more basic postures (such as the sarvanga-asana, dhanura-asana, ugra-asana, etc.). If you are attempting the headstand for the first time and you are alone we recommend you position yourself facing a wall with your knees about three feet from the wall. If you should lose your balance after lifting your legs you can use the wall for support to return gently from the posture.
The greatest physical benefits of the sirsha-asana are to the neck, spine and brain. Regular practice of this posture adds suppleness to the spine and increases the flow of blood to the brain. It enhances poise and balance and relieves stress and tension in the lower portions of the body.
The benefits of sirsha-asana are not only physical. The mental benefits are also plentiful. You will find that daily practice of the headstand enhances awareness, sharpens attention and improves the memory.
Durations/Repetitions:
Hold the sirsha-asana for 15-30 seconds when you first attempt it and increase the duration gradually over a period of a few weeks. As you skill increases you should hold it for as long as you feel comfortable.


Cautions/Restrictions:
If you are new to Yoga we recommend that you find a qualified instructor to teach you this posture and monitor you performance. If you attempting this alone position yourself in front of a wall as mentioned above.

If you are suffering from high or low blood pressure you should not attempt this posture.
The sirsha-asana should not be performed by woman who are menstruating, as is the case with all inverted postures (where the legs are raise over the head).

Variations:
There are several variations to the sirsha-asana that you can try when you are comfortable with the standard variation. First try spreading your legs wide apart, carefully separating them very slowly, while maintaining your balance, until they are as far apart as is comfortable. Bring your legs together before returning from the posture. Next you can try placing the soles of your feet together while steadily holding the pose.


Easy Video Tutorials


Ardha-matsyendra-asana (The Half Spinal Twist Pose)

Ardha means half. Matsyendra is one of many Siddhas or masters who where accomplished Yogis mentioned in the medieval Yoga text the Hatha-Yoga-Pradipika. This posture posture is traditionally called the Spinal Twist because the spinal column is twisted gently.

"Keeping the abdominal region at ease like the back, bending the left leg, place it on the right thigh; then place on this the elbow of the right hand, and place the face on the palm of the right hand, and fix the gaize between the eye-brows. This is called Matsyendra-posture."Hatha-yoga-pradipika I.37

The Half Spinal Twist Posture (Ardha-matsyendra-asana)


Instruction:
1 Sit in any comfortable cross-legged position.
2 Straighten the legs out in front. Bend the right knee and bring the heel of the right foot close to the left hip.
3 Inhale and bend the left knee upward and place the left foot flat on the floor to the right of the right leg with the ankle touching the right thigh.
4 While turning the spine to the left straighten the right arm bringing it around to the outside of the left knee and grasp the left foot with the right hand.
5 Turn your head as far as possible to the left and bend the left arm behind your back. Keep your spine, neck and head aligned and continue to exert effort at turning to the left.
6 Repeat the posture the other side by reversing directions 2-6.
Benefits:
The Half Spinal Twist is one of the best Yoga postures for cultivating flexibility and strength in the spine. It sooths stiff necks and upper back tension caused by stress, poor posture, or prolonged periods of sitting in one position. The alternating compression and release of the abdominal region flushes this area with blood and massages the internal organs. Muscles of the stomach and hips are also toned from repeated practice of the Half Spinal Twist.
Durations/Repetitions:
The posture can be held for as long as you are comfortable. (One repetition consists of performing the posture on each side. Two to three full repetitions should be done at each session.


Easy Video Tutorials

Ardhachandra Asana ( The Half-moon Pose )

The Sanskrit word ardha means "half," and the word chandra means "moon," thus, this is the "half moon" posture.

"Standing straight on the left leg, bend the right leg and place the right foot on the root of the left thigh. Stand thus like a tree on the ground. This is called vriksha-asana." Gheranda-samhita II.36


Ardhachandra-asana - The Half-moon Posture


Instructions:
1. Stand in the tada-asana (Stand with both feet touching from the heel to the big toe, keeping the back straight and the arms pressed slightly against the sides with palms facing inward.
2. Bring the hands together at the chest with palms lightly pressed against each other (the Anjali-mudra).
3. Inhale and raise the arms straight up keeping the palms pressed lightly together.
4. Arch your body backwards keeping your arms alongside your neck and head, tilt the head backward and hold. Keep your knees straight while holding posture.
5. Slowly return to the tada-asana.

Benefits:
The ardha-chandra-asana is a basic stretching and balancing pose that benefits principly the lower back, abdomen and chest. It isequally suitable for use in your stretching routine as well as formal asana practice.
This pose is also one the postures that are are sequenced in surya-namaskar (the Sun Salutation).

Durations/Repetitions:
Repeat ardha-chandra-asana two to three times.

Garuda-Asana ( The Eagle Pose )

The Sanskrit word garuda means eagle. In Hindu mythology Garuda is known as the king of birds. He transports the God Vishnu (shown with a bow and arrow in the illustration to the left) and is said to be eager to help humanity fight againt deamons.


Garuda-asana - The Eagle Posture


Instructions:
1 Stand with the feet together and the arms by your sides (see the tad-asana or mountain pose).
2 Draw the left foot upward bending the knee and wrap the left foot around your right leg as you rest the back of your left thigh on the right thigh.
3 Cross your arms at the elbows, left over right.
4 Join the palms of your hands together keeping the fingers pointed upward.
5 Inhale and hold the posture for the duration of the inhaled breath.
6 Exhale and return to the tada-asana. Repeat the posture on the opposite side, wrapping the right leg over the left and the right arm over left.


Benefits:
The Garuda-asana will strengthen the legs, knees and ankles. It stretches and tones muscles of the leg and can help relieve cramps of the legs.

Durations/Repetitions:
Hold the hala-asana for as long as you are comfortable. 20-30 seconds is fine for early attempts, increase the time gradually as you become more comfortable. You can also try holding the posture for as long as you can hold the inhaled breath. Repeat 2 or 3 times on each leg.

VIDEO TUTORIAL

Gomukha Asan ( The Cow-face Pose )

It's called the Cow Face pose because, when seen from the front, the outline of the body is thought to resemble the broad mouth and narrow head of a cow.

"Placing the right ankle on the left side and the left ankle on the right side, makes Gomukha-asana, having the appearance of a cow ." Hatha-yoga pradipika I.22
"Place both feet on the ground with heels crossed under the buttocks. Sit straight and still, the mouth raised. This is called Gomukha-asana, resembling the mouth of a cow. "Gherunda-samhita II.16
Gomukha Asan ( The Cow-face Posture )


Instruction:
1. Sit in a crossed-leg position, right leg over left.
2. Spread the legs as far apart as possible without bending the knees.
3. Bend the left knee and place the bottom of the left foot against the inner left thigh. Bring the left heel as close to the perineum as possible. Keep the left knee on the floor.
4. Grasp the right foot with the left hand and keeping the foot on the floor place the heel of the right foot against the front-left portion of the left buttock. The right knee should be directly on top of the left knee.
5. Inhale slowly through the nostrils and raise the right hand over the head and bend the right elbow. Reach behind the back with the left hand and clasp the fingers of both hands (forming an "s" shaped lock).
6. Hold the posture as long as you can comfortably hold the inhale breath. Exhale slowly and then repeat the posture reversing the arms and legs.

Benefits :
This posture stretches the arms, upper back, chest and the sides of the chest and abdomen. As the shoulder blades are stretched backward the lungs are expanded and as the abdominal muscles are lifted the stomach is toned. It helps to relieve neck strain, backache and tight shoulders. The hands, fingers and wrists are strengthened.

Durations :
You can either hold the posture while the breath is held or you can try holding the posture while breathing gently through the nostrils. If you choose to breath, then hold the posture for thirty seconds to a minute. Repeat the gomukha-asana two to three times on each side.


Variations:
If you are unable to lock the fingers behind the back you may grasp one end of a small piece of cloth in the right hand and the other end of the cloth in the left hand.


Video Tutorials


Bala-asana (The Child Pose )

"As inumerable cups full of water, many reflections of the sun are seen, but the sun is the same; similarly individuals, like cups, are inumerable, but spirit, like the sun, is one." The Shiva-samhita I.35 II.42-43.


Bala-asana (The Child Pose ) Posture


The Child Pose (Bala-asana ) Instruction:
1 Sit on your knees with your feet together and buttocks resting on your heels. Separate your knees about the width of your hips. Place your hands on your thighs, palms down. (This is the vajra-asana or Thunderbolt Pose).
2 Inhale deeply, then exhale as you bring your chest between your knees while swinging your arms forward.
3 Rest your forehead on the floor, if possible, and then bring your arms around to your sides until the hands on resting on either side of your feet, palms up.
4 Breath gently through your nostrils as you hold the posture. Hold for about one to two minutes. Then return to asn upright kneeling position with your back straight and your hands on your thighs.
5 Repeat the posture at least one more time.

Comments:
The bala-asana is one of the more relaxing Yoga postures and can easily be done by beginners. As part of your Yoga routine it is best used as a counter-pose to any posture that stretch the spine backward (such as the naga-asana, the dhanura-asana, the chakra-asana, the ushtra-asana, etc.)
The bala-asana gently stretches and relaxes the shoulders, neck, back muscles and thighs.

Durations/Repetitions:
The bala-asana can be held for as long as is comfortable. Repeat at least twice if it is held for less than a minute.

Video Tutorials